
So now you’ve got your kit and have performed or are performing the modification, and oops! you’ve run into a problem. What’s next? First take a look at some of the most common support issues to see if any apply to you. If a solution to your problem can’t be found here our technicians are happy to assist. Simply fill out the form at the bottom of the page.
Symptom: Focus can’t be achieved at any setting once a C-Mount lens or C-Mount adapter is connected.
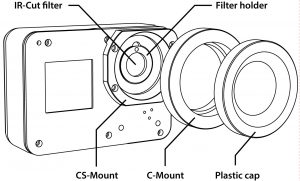
Solution: In most cases the solution to this problem is quite simple. The Ribcage is a CS-Mount camera that requires a 5mm C-Mount spacer ring to be attached to achieve focus with C-Mount lenses. This ring is included in your kit and comes with a plastic protective cap screwed into it. Simply install it and you should be good to go! If you’ve lost it, first check your lenses to make sure it’s not still attached to one of them. Replacements are available if needed.

Symptoms: Recorded video and pictures appear pink in color. Color can sometimes appear normal under artificial light, but is pink outdoors. Some lenses can’t quite focus to infinity.
Solution: The IR-cut filter is not installed in your camera. Every Ribcage camera and mod kit are supplied with IR-cut filters that prevent Infrared light from reaching the camera sensor. Infrared appears pink when recorded. When using M12 lenses you may not be able to install the filter depending on what camera you are using. The filter is integrated with most M12 lenses but some ‘IR corrected’ lenses may not have the filter. IR Corrected or Day & Night lenses have special optics so that IR and visible light are both in focus at the same time, but will likely not block IR.

Symptom: M12 lens has been threaded in as far as it will go without ever achieving focus
Solution: Our M12 mounts are designed to accept the broadest number of lenses possible. There are a tremendous variety of lenses available so some may require some extra steps. There can be a few reasons for this issue:
- Your lens may actually need to be farther from the image sensor than the built in socket allows for. In these cases you can use our M12 to CS-Mount adapter to achieve the added length, or if using a Hero4 Mod, our dedicated ‘Deep Socket’ M12 Mount.
- Your lens may need to be extremely close, in which case the IR-Cut filter in the camera may need to be removed to allow the lens to move in far enough. Most M12’s have a built in IR-Cut Filter.
- (Hero4) Check to insure your O-ring is installed in front of the IR-Cut filter. That will allow a lens to move an extra 1mm.
- (Hero4) Some lenses may not focus when two filters are present in the camera. One or both may need to be removed.


Symptom: Black spots and marks are visible in the recorded footage. Problem worsens as the iris is closed.
Solution: This is typically an indicator that your image sensor and/or IR-Cut filter need to be cleaned. As with any interchangeable lens camera dust and debris can enter the body during lens changes.
- First try removing the lens and use a puffer to blow out any dust and debris. Ensure the rear element of the lens being used is clean.
- Remove the IR-Cut filter and use a microfiber cleaning cloth and some lens fluid to clean the filter and sensor.
- A Lenspen MiniPro does a great job cleaning the sensor
Best Practices: A puffer is a good investment and will take care of most dust related issues. They can be purchased at any camera store for a few dollars. When performing lens changes it’s important to keep the image sensor sheltered, especially if you are outdoors. We recommend pointing the camera towards the ground when removing and attaching lenses. That way debris is less likely to fall on the sensor when it’s exposed. Keep the sensor covered with the provided plastic cap when a lens isn’t attached.
Symptom: Focus isn’t sharp at all zoom positions when zooming in and out
Solution: Flange adjustment required:
- First verify that your lens is Parfocal (can zoom in and out while keeping focus) and not a varifocal. Varifocal lenses can have the focal length changed but must be re-focused.
- Our kits and cameras are built to accommodate as many lenses as possible. Some lenses, in particular zoom lenses, each have their own ‘sweet spot’ so to speak. In those cases a slight flange adjustment is needed for perfect operation. This PDF document outlines how to set up your camera for perfect zooming. It shows a Computar 8-48mm lens but the steps are the same for most lenses.
Symptom: Noisy Yellow vertical lines, especially in bright areas
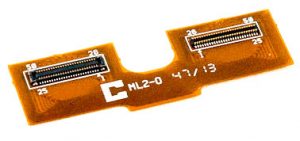
Solution: There seems to be an impedance issue with a small number of older Hero3 Black models which can manifest as yellow noise once the kit is installed. The best solution in this situation is to contact Back-Bone support and we should be able to get you fixed up. This particular issue does not affect the Hero3+, so in the unlikely event you see yellow noise you may have an imperfection in your flexible PCB jumper. Contact Back-Bone support for a replacement.
Symptom: Excessive noise, horizontal lines in video
Solution: verify that the jumper is properly connected to the main board. In some cases the jumper can become partially disconnected from the board when the camera is closed. Re-seat the connector and add some extra electric tape to the metal backing to ensure the jumper remains sandwiched in place once everything is closed back up. If that doesn’t fix the issue please contact support.
Symptom: Camera freezes when changing modes or when attempting to record. No image is visible on rear LCD/Bacpac or HDMI
Solution: This is a typical symptom of a jumper extension ribbon that’s improperly connected at one end.
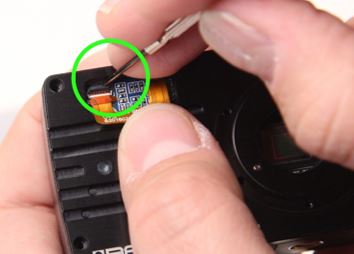
- Remove battery, open your camera and verify that the ribbon is correctly attached to the image sensor. Re-test
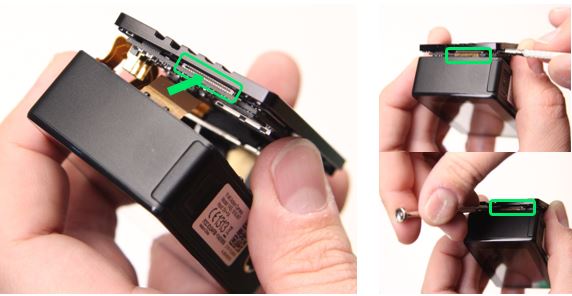
- If that fails verify that the jumper is properly connected to the main board. In some cases, more commonly with Hero4, the jumper can become partially disconnected from the board when the camera is closed. Re-seat the connector and add some extra electric tape to the metal backing to ensure the jumper remains sandwiched in place once everything is closed back up.
- If the previous steps are unsuccessful inspect both the image sensor and jumper ribbon for signs of damage. Replacements are available if required.
- If no damage is visible please contact support using the form below. A replacement part may be required.
Symptom: Once you’ve mounted the PCB board to our plates and tried to re-insert it into the GoPro camera body it won’t go in, or it’ an extremely tight fit.
Solution: Pages 20 and 21 of the installation guide describe filing off part of a small tab on the circuit board. It is likely that you haven’t removed quite enough from the tab and the circuit board is not perfectly in position. Remove a bit more from the tab, ensure your main board is straight and sitting correctly and everything should fit back in.
Symptom: Blurry focus on the left or right when the center is in focus
Solution: This is a symptom of one of the elements having a slight tilt:
- If using CS or C-Mount ensure that the CS-Mount ring sits flat and level against the faceplate
- Ensure the M12 ring or ‘Deep Socket’ M12 Mount sits flat against the faceplate
- If using M12 lenses try using a locking ring to set your focus instead of the set screw. Our M12 mount is built to accept a broad number of lenses, so some may be looser than others. If the fit is a little loose the set screw may cause a slight tilt. A locking ring provides even downward pressure.
- If lens fit is too loose we do have a plastic M12 Mount (Hero4 only) that’s designed to hold metal barreled lenses much more snugly. Not recommended for plastic lenses. Contact Support for information.
- If re-positioning the lens rings and refocusing the lens as per the previous suggestions doesn’t work the image sensor itself may not be sitting flat against the camera faceplate. You will need to open up your mod to ensure that there is no debris or burrs on the edge of the circuit board that might be preventing it from lying flat.
- If the above steps don’t solve your problem or if you believe you have identified a defect please contact support by filling out the form below.
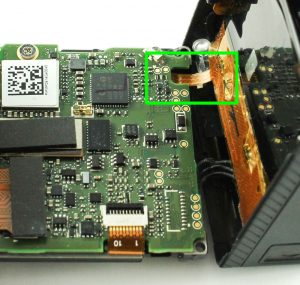
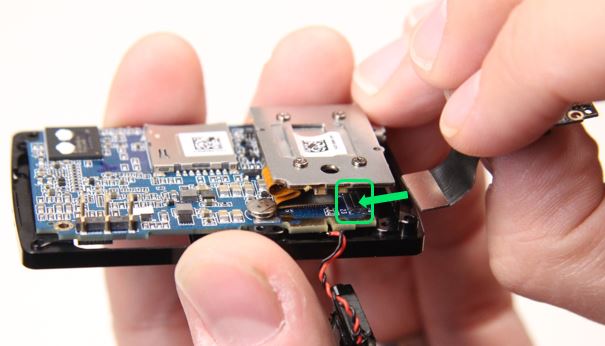
Symptoms: The side button does not function consistently or at all, distorted sound or no sound in videos.
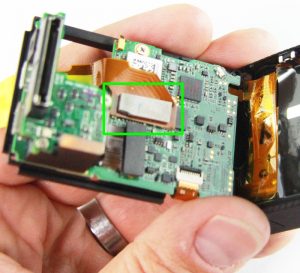
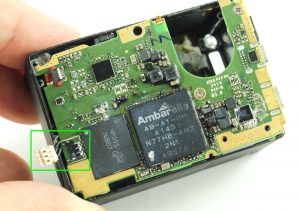
Solution: This is usually caused by a disconnected ribbon on the side of the main board as pictured. Check that the ribbon is fully inserted and the locking tab is down to hold it in place.
Symptoms: The camera won’t power on when the button is pressed, power/mode button operation is inconsistent.
Solution: This is typically a loose connector that needs to be properly fastened. Check the LCD button strip on the front of the camera to make sure the ribbon is fully inserted into the socket and the locking tab is in place. Also check to make sure the leads from the battery compartment are connected to the board correctly (white connector). If these solutions don’t solve the problem inspect both connectors for damage and contact support via the form below.
Symptoms: Rear LCD displays no image or an image that’s noisy or distorted.
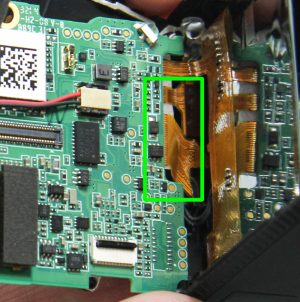
Solution: The widest ribbon attached to the side of the main board is not correctly inserted. Make sure the ribbon is fully inserted and straight with the locking tab in place. The problem can be caused by a ribbon that is inserted at a very slight angle. It’s a good idea to check the other connections to the side of the board at the same time.
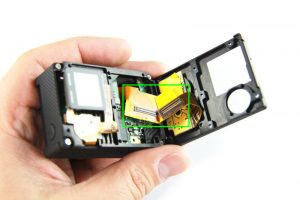
Symptom: YI 4K/4K+ camera won’t power on after modification
Solution: Make sure your battery is charged. The camera should power on even with several of the components disconnected. Also, check to make sure the ribbon from the power/capture button is properly connected with the locking tab down. (located under plastic cap on the front of the camera).
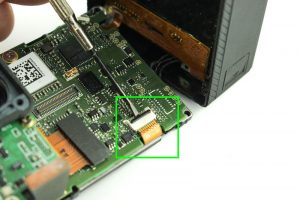
Symptoms: No power to rear screen, no image displayed, does not respond to touch
Solution: The broad ribbon on the side of the main board is not properly connected so the LCD panel is not receiving power. re-seat the connector and make sure it’s fully inserted with the locking tab down.
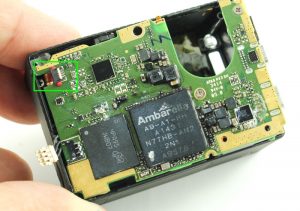
Symptom: No wireless connectivity
Solution: verify that the WiFi module is properly connected to the main board.
Symptoms: No sound from speaker at power-up, no sound from camera during playback
Solution: Make sure the two wires connected to the speaker are still connected. If one of them has broken loose from the connection point it will need to be re-soldered. That’s easily done with a standard soldering iron available at any hardware store. Also check to make sure the wires haven’t become sandwiched underneath the speaker assembly causing a disconnection.

Symptoms: No audio present in recorded videos, left or right audio channel is missing
Solutions: First verify that the audio recording isn’t disabled in the camera menu. If that’s not the issue, then check to make sure the ribbon from the power/capture button is properly connected with the locking tab down (located under rubber cap on the front of the camera). That ribbon also connects the left and right microphones to the main board.