IMPORTANT: Back-Bone Modified GoPro cameras are not waterproof.

Note: H9, H10 and H11PRO cameras are not capable of shooting in infrared

Using the Camera for the First Time

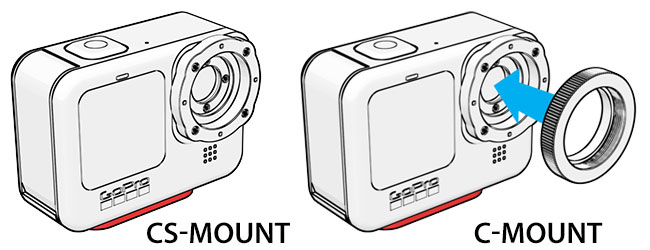
Remove the plastic cap from the C-Mount spacer ring. It is sometimes assumed that the metal spacer ring is a part of the cap but it’s actually required to properly focus C-Mount lenses. Without the spacer ring the camera can be used with CS-Mount lenses. We also recommend removing the C-Mount spacer ring when using the included M12 to CS-Mount adapter.

Cleaning & Changing Filters

Each camera comes with a protective glass filter installed. You may wish to remove this filter in order to clean, switch filter types or use an M12 lens that needs more room for proper focus. Replacement filters are available in the accessories section of our shop.

  • Use the pointy end of the plastic spudger tool or some tweezers to gently pop out the O-ring holding the filter in place (spudger tool is located in the lid of the camera case)
  • Turn the camera over and drop the filter into a microfiber cloth
  • If required, clean the sensor. We recommend using a Lenspen MicroPro followed by an air puffer. You can also use some lens spray and a microfiber cloth followed by a puffer. The same tools can be used to clean the filter itself.
  • Hold the filter by the edges. With the camera at a 45 degree angle gently drop the filter into the socket. Take care not to drop the filter edge first onto the sensor.
  • Replace the O-ring using your spudger tool.

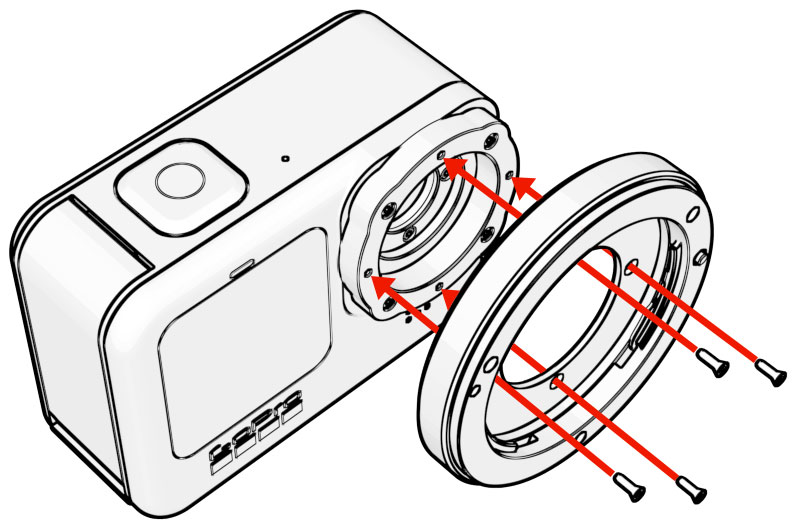
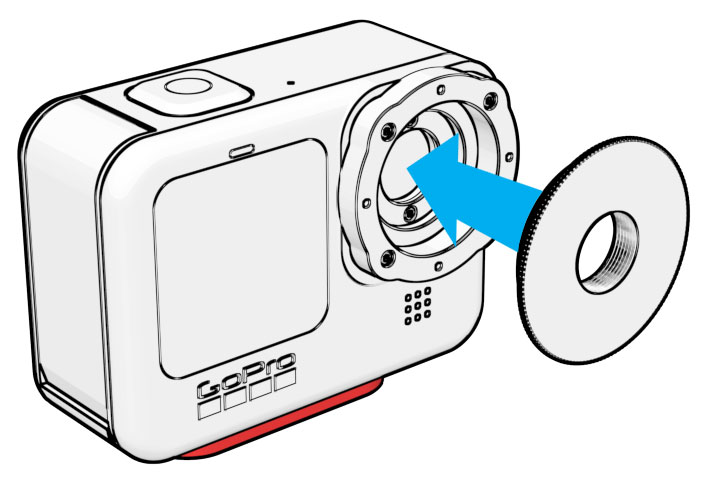
Adding CS & C-Mount Lenses

  • For C-Mount lenses add the 5mm spacer ring, for CS-Mount lenses remove it
  • Focus the lens as desired using the rear display or an external monitor (HDMI output is available via the GoPro HERO9 Media Mod)

Pro Tip: Most CS & C-Mount lenses perform best between f4 and f8. Shoot with the iris wide open for soft focused backgrounds in your close-ups. Shoot with the iris closed down for sharp far shots.

Using Lens Adapters

If using C-Mount adapters to mount other lens types on your camera, make sure the 5mm C-Mount spacer is attached and the filter is properly installed. The filter is required for achieving focus to infinity.

Crop Factor Information

Lenses designed for larger sensors or film formats will appear somewhat magnified when used with the smaller 1/2.3″ GoPro sensor. Here are the focal length multipliers for several popular lens types.
  • 1/2.3″ M12 – 1.0x
  • 1/2″ C-Mount / M12 – 1.02x
  • 1/1.8″ C-Mount / M12 – 1.15x
  • 2/3” C-Mount – 1.41x
  • 16mm (Bolex) – 1.63x
  • Super 16 – 1.86x
  • 1” C-Mount – 2.05x
  • 1.1” C-Mount – 2.18x
  • Micro Four Thirds – 2.77x
  • APS-C – 3.42x
  • DX – 3.64x
  • APS-H – 4.42x
  • 35mm (Full Frame) – 5.54x

For more information on crop factors please visit this page.

Pro Tip: visit www.back-bone.ca/shop for a wide selection of lens adapters

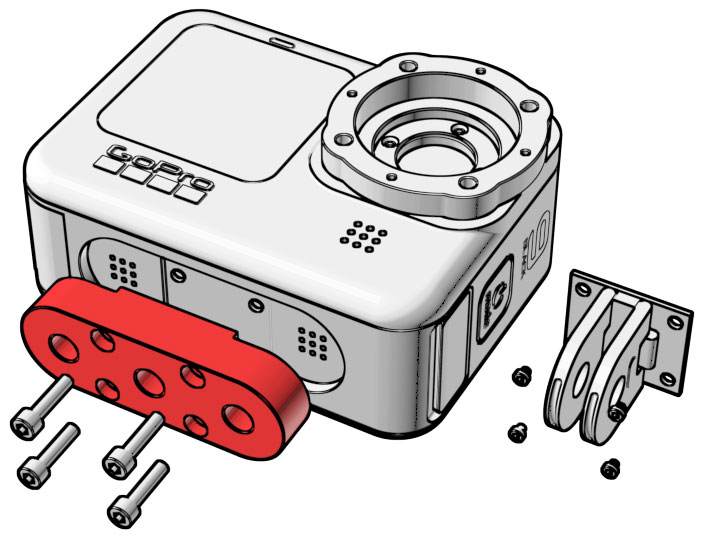
Switching the Base Mount

Each camera comes with GoPro’s original folding mount already installed. That mount is great for use with the Media Mod and for attaching to GoPro’s various mounts and accessories. If you’d like to use the camera with standard tripods and accessories you can use the red aluminum Back-Bone tripod mount that’s included. Simply remove the four screws using the supplied T5 screwdriver. Place the tripod mounting block on the bottom of the camera and fasten it using the supplied screws and Allen key. We recommend keeping the unused mount and screws in the baggie to keep the parts together.

Support

Got a question about your camera? Get up and running with our help! Take a look at our Troubleshooting Guide or FAQ for some solutions to common problems, if the answer isn’t there drop us a line.

For more help with our product please visit www.back-bone.ca/support or email us

support@back-bone.ca

Mounting M12 Lenses

Note: Some super wide angle and fisheye M12 lenses may not be compatible with the H9PRO & H10PRO. The M12 lenses in our shop clearly list their compatibility in the product details. As a general rule M12 lenses with a back focus distance of 3.2mm or under are not compatible.

  • Remove the C-Mount ring
  • Screw the M12 to CS adapter ring onto the camera (Yellow Bag).
  • Gently screw in your lens and check to see if it will focus. If it stops turning before it’s sharp you will need to remove the filter from the camera. If it still will not focus after removing the filter it likely has a back focus under 3.2mm and is not compatible. Take the lens back out.
  • Thread the small black locking ring onto your lens.
  • Screw the lens into the adapter until sharply in focus.
  • It helps to connect the camera to a large screen via HDMI / Media Mod. If using the rear screen on the camera set the focus while zoomed in all the way in Photo mode. Zoom back out and take some pictures. Verify sharp focus across the entire image via GoPro app or PC.
  • Tighten the locking ring against the adapter to lock the lens in place.
  • You can also tighten the locking ring against the orange O-ring if desired.

TIPS

  • If your M12 lens feels a little loose inside the adapter, try wrapping a layer of Teflon tape around it. That will ensure a snug fit so that the lens is perfectly aligned with the image sensor. Teflon tape is cheap and readily available in the plumbing section of any hardware store.

  • Keep an air puffer and microfiber cleaning cloth in your shooting kit so you can blow debris out of the camera if needed and keep your lenses crystal clean.
Pro Tip: Get extra M12 adapters so you have one for each of your M12’s. Once you have them set up and locked in place in the adapter ring you can perform quick lens changes on the fly! Extra adapters are available at www.back-bone.ca/shop

Adding the MFT Mount

Your camera comes with an optional Micro Four Thirds mount that can be used with manual lenses. Adding and removing the mount is quick and easy. It can be found underneath the cardboard tray at the bottom of the camera case.

  • Remove any lenses as well as the M12 adapter or C-Mount ring
  • Take the MFT mount from the package and align it onto the CS-Mount ring so that the lens locking pin and release tab are on the right side
  • Use the black T3 screw driver to add the 4 included steel screws.

Note: The camera is not capable of supplying power or communications to fully automatic lenses. Lenses with fully manual focus and iris control are recommended.
 

Troubleshooting: 

My camera turns off after just a few seconds! Use the side button to power on the camera instead of the top. Quick capture is triggered by default when you hit the top button so it will try and record. If no SD card is found the camera will display the message ‘Insert SD Card’ on the rear screen and then shut off.
My M12 Lens Won’t Focus! Try removing the glass filter from the camera to give the lens some extra room to focus. If the lens still won’t go in far enough it likely requires a back focus distance of less than 3.2mm and is not compatible with the H9PRO. The lenses we sell in our shop have their compatibility listed in the product details. As a general rule, M12 lenses with a back focus distance greater than 3.2mm should be fully compatible. Back focus distance is sometimes called ‘Flange Distance’. Lens manufacturers usually supply that information in their product details.
My C-Mount lens won’t focus!: This usually means that you simply need to add the supplied 5mm C-Mount spacer ring to the camera before adding your lens. It comes mounted on the camera with a plastic cap screwed into it. Also make sure that the protective glass filter is installed in the camera as that has a small effect on the focus of lenses. Also make sure that the internal glass filter is properly installed in the camera as that has an affect on the focus. The filter is pre-installed.
Dark spots in footage, especially when iris is closed down: Your image sensor or filter needs to be cleaned. Using an air puffer is usually enough to blow away any small particles that might have gotten on the sensor. A LensPen MiniPro is also a great tool for cleaning the small GoPro sensor. Also verify that there is no dust or debris on the back of the lens.
Images are blurry on one side with M12’s: Likely your lens is not perfectly aligned with the image sensor. Some lenses have looser thread engagement than others which may cause a very slight tilt. Try adding a layer of Teflon tape to the lens barrel before adding it to the adapter ring as outlined in the tips.

NOTE: We’ve done our best to accommodate the vast majority of M12, CS and C-Mount lenses on the market, however there will be some designs that aren’t compatible. M12 lenses that are extremely short, have odd shaped barrels or short threads may not work. M12 lenses must have a back focus distance (flange distance) of 3.2mm or higher. The lenses at www.back-bone.ca have their compatibility clearly marked. When buying M12 lenses elsewhere look for 1/2.3”, 1/2” or 1/1.8″ lenses. We recommend 1/2”, 1/1.8” or 2/3” C-Mount lenses with high resolution ‘megapixel’ optics.