QUICKSTART GUIDE

Changing the Filter
Your Ribcage RX0 camera comes with an IR-Cut filter pre-installed to prevent infrared light from reaching the sensor – stopping the IR allows you to capture accurate color. There are numerous applications where you might want to replace that IR-Cut with a different filter – working in infrared or with NDVI (crop management) are examples.
- To remove the filter, use a pair of small tweezers to pull out the rubber O-ring holding it in place. There’s a small notch above it for this purpose.
- Turn the camera over and drop the filter into a microfibre cloth. If you intend to use the filter again be sure to place it somewhere safe where it will be clean and protected.
- Visually inspect the image sensor and new filter; clean if required. Hold the filter by the edges and drop it back into the socket and replace the O-ring.
Pro Tip: Use your own custom filters if required. They must be 15.2mm in diameter and up to 1.1mm thick. IR-Cut and Infrared ‘Cold Mirror’ filters are relatively inexpensive and if you plan to change filters for any application, it may be advisable to have spares on hand – they are available in our shop.
Cleaning
Routine changing of lenses and/or filters may cause the need for cleaning the filter and/or image sensor. A symptom of this is may be small dark spots in your images when your iris setting is high. In many cases just using a puffer to blow dust off the filter is sufficient. Never use tissues for cleaning as they leave a lot of small debris behind and can create tiny abrasions.
- Remove the filter as outlined in the section above
- Before cleaning use a puffer to blow loose debris from the filter and image sensor
- We recommend using a LensPen MiniPro followed by a puffer for optimal results. Both can be found at photo stores online and in camera stores for just a few dollars. Use small circular motions to clean lenses and filters, then follow-up with a puffer.
- You may also use lens fluid and a microfiber cleaning cloth. When cleaning the sensor, never spray the fluid directly on the surface. Use a puffer to blow off any loose material, then spray a clean micro fibre cloth, wrap it over the end of a cotton swab and use small circular motions. Once the surface dries, use your puffer again to remove any remaining dust.
- To clean the filter simply drop it into a sprayed cloth and wipe until clear. If using a LensPen MiniPro, make sure to use your puffer to blow off any loose debris first.
- Replace the filter as outlined in the section above.
- Test the camera by shooting a light-colored surface such as a wall with a high f-stop setting on your lens (f16). Repeat if needed.
Removing the Tripod Mount
For some applications such as gimbal or drone mounting, you might want to remove the attached tripod mounting plate. The Allen keys required are supplied with your camera.
Quick Steps (video below):
- Remove the three screws holding on the lens mounting ring
- Remove the two large screws at the bottom of the camera
- Detach the tripod mounting plate
- Replace the lens mounting ring
Troubleshooting & Known Issues:
Error Code E:61:00: Enabling your camera to accept a wide array of lens choices requires that we remove the original SONY lens assembly. As a result, the auto-focus drive can no longer determine that lenses’ position, resulting in the error code. This has no effect on the performance of the camera and the error code will not appear in any footage.
Camera Freezes When Using Mobile App: If you find that the camera hangs or freezes when trying to capture via the Sony Playmobile app, simply change your focus method to ‘PF’ instead of ‘MF’.
My footage looks pink! You need to re-install the supplied IR-Cut filter which prevents infra-red light from reaching the sensor. Spare filters can be found here.
Dark spots in footage, especially when iris is closed down: Your image sensor or filter needs to be cleaned and/or you need to ensure that there is no dust or debris on the back of the lens. Using an air puffer is usually enough to blow away small particles that may have gotten on the sensor or lens. A LensPen MiniPro is also a great tool for cleaning – see notes above about cleaning.
My lens isn’t straight: When using a lens or adapter with a built in tripod mount from time to time you may find that the lens is off by a couple of degrees. Typically this can be corrected by simply adjusting the tripod mount on the lens or adapter. In the rare case where that isn’t possible, rotate the camera as needed by easily removing the lens locking pin from the camera:
- Remove the MFT mount by loosening the 3 screws almost to the point of removal with the provided Allen key.
- Take the lens locking pin/button out and keep in a safe place.
- Replace the mounting ring. Make sure the logo is at the top and tighten the screws (Don’t overtighten).
Switching to C-Mount
What Lenses can I Use?
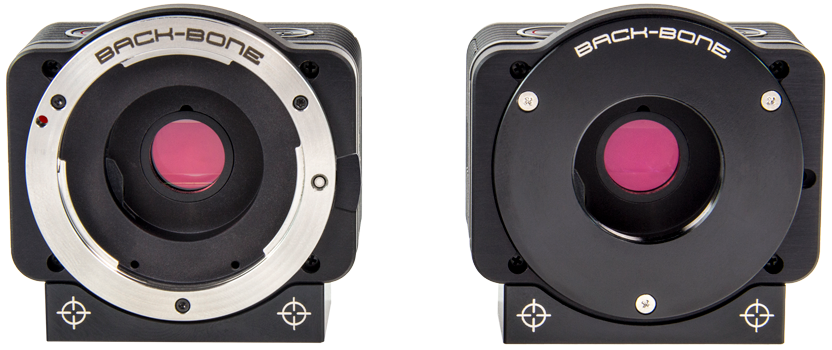
Your Ribcage RX0 camera comes configured with an MFT mount which is designed for manual lenses. The mount does not supply power or communicate with autofocus lenses. You can also re-configure the camera with a dedicated C-Mount by following the instructions found on this page – that enables all C-mount lenses. Parts included.
A separate C-Mount to MFT adapter may be used with the MFT mount, however, the number of lenses that can be used with this approach is limited. Some C-Mount lenses are too large to fit down into the adapter for proper focus.
You can also use MFT or C-Mount adapters to mount other lens types such as Canon & Nikon on your camera. We recommend using lenses that have manual controls – our modified camera does not supply power to full auto lenses. However, if needed, adapters are available through our store that add manual iris control to full auto lenses.
C-Mount Lens Recommendations
1″ or 1.1″ format C-Mount lenses are ideal and will give you the best results. 16mm Bolex film camera lenses are typically C-Mount and are a great choice. In many cases 2/3″ format lenses can be used without vignetting (dark corners) but there may be softness or some distortion at the edges depending on the lens used. If using a 2/3″ lens we recommend 16mm or higher for better results and less chance of vignetting.
Pro Tip: visit our shop for a wide selection of lens adapters
About Infrared
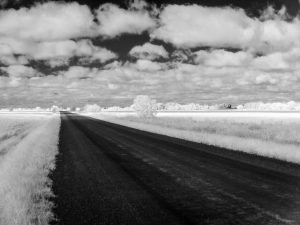
Remove the IR blocking filter from your camera if you’d like to perform ‘full spectrum’ imaging, however, focus can be ‘soft’ without special ‘IR-corrected’ or ‘Day & Night’ lenses. Infrared is typically blurry when visible light is in focus, resulting in that ‘softness’. An ‘IR-corrected’ lens has special optics to allow visible light and IR to be in focus at the same time.
We recommend using a Cold Mirror filter when shooting with ‘normal’ lenses i.e. without special ‘IR-corrected’ or ‘Day & Night’ lenses. Cold Mirror filters completely block visible light and only allow IR into the camera. You can also use an IR illuminator for night vision in the dark. You can set up your own custom picture profiles to get exactly the look you want. Certain lenses may not be able to focus to infinity in infrared. For more information check out this helpful page.
Pro Tip: Ribcage RX0 Cold Mirror infrared filters are available in our online shop.
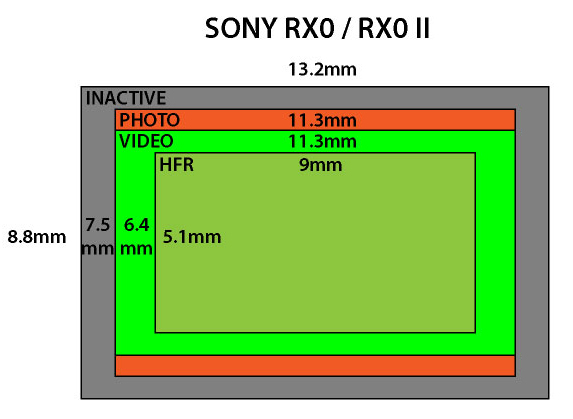
Crop Factors
While the RX0 does have a 1” 21MP image sensor an effective area of 15.3MP is used. Here are the crop factors you can expect when mounting these common lens types:
- 2/3” C-Mount – 0.78x (some longer 16mm+ 2/3” lenses will cover the sensor though they are technically too small)
- 16mm (Bolex) – 0.9x (most 16mm lenses will cover the sensor with no vignette)
- Super 16 – 1.03x
- 1” C-Mount – 1.13x
- 1.1” C-Mount – 1.25x
- Micro Four Thirds – 1.45x
- APS-C – 1.89x
- DX – 2.01x
- APS-H – 2.45x
- 35mm (Full Frame) – 3.07x
Weight Info (Ribcage RX0 II):
C-Mount Configuration: 177g (0.39 lbs)
MFT Configuration: 183g (0.4 lbs)
Support
Got a question? Take a look at our Troubleshooting Guide or FAQ for some solutions to common problems and if the answer isn’t there, drop us a line.
For more help with our products please visit www.back-bone.ca/support or email us